A Primer on Making Your Own Gem
After being inspired by Flatiron students who created a shitavisays gem, I decided to prepare myself now to make a gem in the future. My first step is reading this presentation, which gives a brief overview of the gem-cutting process. See below for my own quick summary.
Introduction (Slides 1-13)
Speaker Nick Quaranto introduces himself and his presentation.
Gem* Definition (Slides 14-22)
Gems are a packed Ruby library or application. RubyGems help you download, install, and manipulate them.
Gem Content (Slides 23-44)
Gems have three things: code, docs, and a gemspec.
Code are the methods that the gem adds to Ruby. Docs describe the code’s functionality or aid the gem without being code. A gemspec specifies the required gems for the code to work.
To access a gem’s code in Ruby, use RubyGems to override the Ruby’s standard $LOAD_PATH. This means a gem’ code, such as found in a bin/ or lib/ folder of that gem, will be put into the $LOAD_PATH.
There’s a difference between .gem an gem files. I’m not sure at the moment, but it seems that a gem is a subset of .gem because while a gem is a packed Ruby library, a .gem includes other data or metadata, both of which need to be unzipped from a compressed file format.
Why Make Gems (Slides 45-53)
Reuse your code, practice coding with interesting projects, and help others.
How to Make a Gem (Slides 54-72)
Locally, you build and install it. Remotely, you push then install.
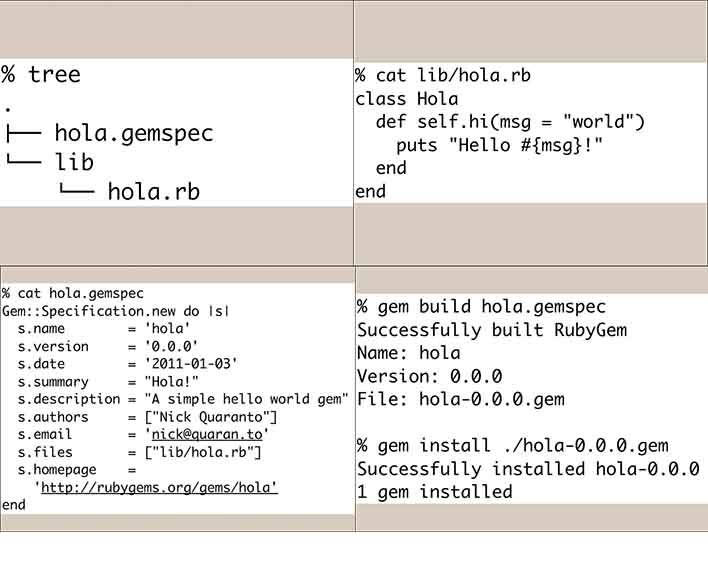 See above for a Gem directory structure, some example code, its Gemspec, and the Gem build command.
LOCALLY
Build
You need to write a Gemspec with metadata on your gem and code files that contain the methods of your Gem.
Install
After you install your gem, you should test it.
REMOTELY
Push and Install
$gem push gem_name-0.0.0.gem will let you push it to RubyGems.org. Then you can install and run it.
Command Line and Gems (Slides 74-84)
Use the bash commands and a little C to modify and improve your Gem! I did not understand exactly how, but here the speaker extends the functionallity of his Gem by letting it take any string as a parameter.
Testing Resources (Slides 85-95)
Test because you are releasing your Gem to the public, and you will be scrutinized.
Documentation (Slides 95-105)
Go to http://yarddoc.org to learn how to document your code. Documentation helps others use your gem. Also, before pushing your gem, strongly consider saying hi to @rubygems on Twitter because webhook allows the rubygems community to scrutinize your gem the moment it’s published, so it’s a good idea to say hi to your future scrutinizers.
Classic Pointers for Gem-Cutting (Slides 106-151)
What to do over the lifetime of a gem.
Make your Gem Accessible
Write a README, use a license so your code isn’t copyrighted, name your gem properly and version it using a major, minor, and patch scheme.
Make your Gem Work
Organize your file structure the right way by having only one top-level file. Also, specify your dependecies by being neither too optimistic or exact with the versions that you expect to work. Instead, specify a range, such all minor gem versions < 1.0.0.
Be Classy
Cut prereleases of your gem so that people who install it have the expectation that it might still have bugs. Furthermore, use continuous integration to constantly test your code, which you can do for free at https://travis-ci.org/.
Gem-cutting Takeaways
- Making a gem is pretty straightforward and rewarding
- To develop confidence, look over the presentation and make the easiest gem
- Prepare for feedback to your gem after you push it